


“The life of a designer is a life of fight. Fight against the ugliness. Just like a doctor fights against disease. For us, the visual disease is what we have around, and what we try to do is cure it somehow with design.”~Massimo Vignelli
In this article I’ll walk you through designing a modern booking desktop interface that is generally robust in terms of its features for instance handling, examining and overseeing reservations.
We will be using the latest version of Bunifu UI Framework 1.5.4 that has new improved controls’ set.
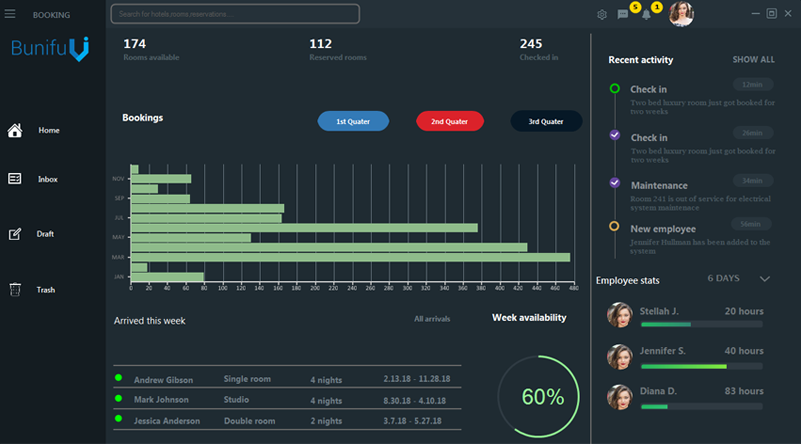
How about we have a quick look at what we will achieve:

Controls Featured
Here’s the controls’-set highlighted on the dashboard:
 What you will require
 What you will require
The design process:
- The first thing we need to do is to start a new project in Visual Studio, then choose a C# or VB.NET project and name your project “Booking app”. Once the form appears, drag the BunifuElipse towards the form.
- The next step is to right-click on the BunifuElipse component that you dragged in the form; select Properties and then change the property value ElipseRadius to ‘9’:
- The next move we should perform is to set the width and the height of the form; the width should have a value of 1270 and the height should have a value of 700. Set the backcolor of the form to have an R.G.B color of 31,43,50
- Drag two panels to the form, then use the dock property to dock one panel to the left and the other panel should have a dock of type fill. Provide a backcolor of the left panel to have an R.G.B color of 20,28,33.
- In the fill panel drag another panel and dock it to the top. Set the backcolor of this top panel to have an R.G.B color of 37,49,57.
- Here’s what we expect to the current form:

The top panel
- Drag a bunifuTextbox to the top panel and set the following properties:
- Add four pictureBoxes aligned side to side and also consider their positions, then set the appropriate icon as per this preview.
- For the close maximize and minimize icons, add three other picture boxes to the top panel. Resize and position them to the right end of the top panel then set their anchor property to right.
- The final output for the top panel should look similar to this:

Let’s now design a custom dialog which pops up when the profile image in the PictureBox is clicked.

Custom Dialog
- Click the project tab in Visual Studio the select ‘Add Windows Form’.
- Name your form as CustomDialogForm, and click add.
- Set the following properties:
CustomDialogForm properties.
Size:216,350.
StartPosition: manual.
BackColor: 71, 81, 87.
- Then Drag a bunifu elipse and in the elipse’s property set its radius to 9.
- Here are the featured controls in the customDialogForm that we’re are required to drag and customize as per our preview:

- You can use Just Color Picker to copy the color values as per our preview.
- Now we’re in the final part of making our customDialog “start rolling” 😄
- Navigate to the main form and in the top panel double click the profile PictureBox. You’ll be navigated to the code view click event of the PictureBox. Write the following code:
[VB.NET]
Private CustomDialogForm As ePictureBox.cs

 Private Sub profilePictureBox_Click(ByVal sender As Object, ByVal e As EventArgs)
			customDialogForm.Location = MousePosition
			customDialogForm.Show()
 End Sub
[C#]
 CustomDialogForm customDialogForm = new CustomDialogForm();

 private void profilePictureBox_Click(object sender, EventArgs e)
        {
            customDialogForm.Location = MousePosition;
            customDialogForm.Show();
        }
Run the program and bingo! our custom dialog should be working.
The left panel
- First, let us give a meaningful name to the left panel. Name it as navigationPanel.
- Drag a PictureBox and a bunifuLabel adjusted side to side. Set a suitable menu icon for the PictureBox. For the bunifuLabel, we can set regular properties right from the design window without moving to the Properties tab, for example, customizing its text.

- Then drag a PictureBox below the above controls and place any logo of your choice.
- Next drag a bunifuButton a to the panel, resize its width to match the panels’ width then set the following properties:
IdleBorderColor: 20,28,33
IdleFillColor: 20,28,33
IdleIconLeftImage: (set your appropriate icon)
OnHoverState:
BorderColor: 40,96,144
FillColor: 40,96,144
IconLeftImage:(set your appropriate icon)
- Copy and paste three other bunifuButtons, then here you need only to change the icons that are in hover and idle state.
- The final yield for the left panel should seem like this:

The sliding panel
Now let’s make a sliding movement animation for the left panel.

We’ll make use of bunifuTransition, to achieve this type of effect.
- Drag bunifuTransition component to the form
- In the name property name it as hideAnimator. Then for the animation type choose particles.
- Drag another bunifuTransition component to the form. This time, name it as showAnimator. Choose the animation type as VertSlide.
- Finally drag another bunifuTransition component to the form, name it as logoAnimator. Choose the animation type as Rotate.
Let’s move to the interesting part where we’ll use the click event of the PictureBox to perform these animations for a sliding panel.
[VB.NET]
Private Sub pictureBox1_Click(ByVal sender As Object, ByVal e As EventArgs)
			If navigationPanel.Width = 50 Then
				navigationPanel.Visible = True
				navigationPanel.Width = 170
				Me.Width = 1279
				showAnimator.ShowSync(navigationPanel)
				logoAnimator.ShowSync(logo)
			Else
				logoAnimator.HideSync(logo)
				panel6.Width = 50
				Me.Width = 1279 - 120
				navigationPanel.Visible = False
				hideAnimator.ShowSync(navigationPanel)

			End If
End Sub
[C#]
private void pictureBox1_Click(object sender, EventArgs e)
        {
            if (navigationPanel.Width == 50)
            {
                navigationPanel.Visible = true;
                navigationPanel.Width = 170;
                this.Width = 1279;
                showAnimator.ShowSync(navigationPanel);
                logoAnimator.ShowSync(logo);
            }
            else
            {
                logoAnimator.HideSync(logo);
                panel6.Width = 50;
                this.Width = 1279 - 120;
                navigationPanel.Visible = false;
                hideAnimator.ShowSync(navigationPanel);

            }
        }
Now we should have our sliding panel working.😇
Let’s move to the next frame…

- We can start by adding the labels on the frame and tweaking their writings utilizing HTML labels!!. Yes, you read right. 😄
- Add a bunifuLabel to that frame

We have to accomplish this organization of content by simply utilizing one label with the assistance of HTML labels!
- In the Text property is where we’ll put the HTML and CSS tags.
- Here’s an HTML code snippet that we’ll put in the Text property to achieve the above format.
<table>
<tr>
<td><b style="font-size:20px;  color: white;">174</b</td>
</tr>
<tr>
<td><b style="color:rgb(78, 94, 101);">Rooms available</b></td>
</table>
- Copy the code to the Text property of bunifuLabel. Here’s the preview:

- Repeat the same procedure for the other two labels. It would be ideal if you note on the location of the bunifuLabels when placing them

- Next, drag a bunifuLabel and three bunifuButtons and position them below the above controls. Set the text property as per from the preview.Also set the font property to Segoe UI,Size:10px, Color: White.
- For the bunifuButtons set the following properties:
Note: Since we’re are going to later refer to the Bunifu buttons it will be wise to rename them to a more meaningful name.
Button Text: 1st Quater.
Name:quaterOneBunifuButton.
Border radius:35px.
IdleBorderColor:51,122,183 . Also for the idlefillcolor use the same color values for border color.
Onhover
BorderColor:51,122,183.
Border radius:35px.
FillColor:31,43,50
Repeat the same procedure for the remaining buttons, providing their color properties using Just Color Picker assistance.
Here’s the output of the current frame:

Adding Bunifu Dataviz
- The procedure is exceptionally straightforward. Drag the bunifuDataviz control to your form and position it beneath the above controls then resize it.
- Next, set the accompanying properties: AxisLineColor:LightGray,AxisXFontColor:Gray, AxisXGridColor: Gray,AxisXThickness:1, AxisYFontColor:224,224,224, AxisYGridColor:t110,124,133, AxisYThickness: 0.
- We’re going to make functions in the code-view to display the charts and later call the functions in the timer_tick event and the three buttons.
- Here’s the code:
[C#]
Random random = new Random();
        private void firstQuaterGraph(Random r)
        {
            var canvas = new Bunifu.DataViz.Canvas();
            var datapoint = new Bunifu.DataViz.DataPoint(Bunifu.DataViz.BunifuDataViz._type.Bunifu_line);
            datapoint.addLabely("Jan", r.Next(0, 500).ToString());
            datapoint.addLabely("Feb", r.Next(0, 500).ToString());
            datapoint.addLabely("Mar", r.Next(0, 500).ToString());
            datapoint.addLabely("Apr", r.Next(0, 500).ToString());
            datapoint.addLabely("May", r.Next(0, 500).ToString());
            datapoint.addLabely("Jun", r.Next(0, 500).ToString());
            datapoint.addLabely("Jul", r.Next(0, 500).ToString());
            canvas.addData(datapoint);
            bunifuDataViz1.colorSet.Add(Color.DarkSeaGreen);
            bunifuDataViz1.Render(canvas);

        }
        private void secondQuater(Random r)
        {
            var canvas = new Bunifu.DataViz.Canvas();
            var datapoint = new Bunifu.DataViz.DataPoint(Bunifu.DataViz.BunifuDataViz._type.Bunifu_stepArea);
            datapoint.addLabely("Jan", r.Next(0, 500).ToString());
            datapoint.addLabely("Feb", r.Next(0, 500).ToString());
            datapoint.addLabely("Mar", r.Next(0, 500).ToString());
            datapoint.addLabely("Apr", r.Next(0, 500).ToString());
            datapoint.addLabely("May", r.Next(0, 500).ToString());
            datapoint.addLabely("Jun", r.Next(0, 500).ToString());
            datapoint.addLabely("Jul", r.Next(0, 500).ToString());
            canvas.addData(datapoint);
            bunifuDataViz1.colorSet.Add(Color.DarkSeaGreen);
            bunifuDataViz1.Render(canvas);

        }
        private void thirdQuaterGraph(Random r)
        {
            var canvas = new Bunifu.DataViz.Canvas();
            var datapoint = new Bunifu.DataViz.DataPoint(Bunifu.DataViz.BunifuDataViz._type.Bunifu_bar);
            datapoint.addLabely("Jan", r.Next(0, 500).ToString());
            datapoint.addLabely("Feb", r.Next(0, 500).ToString());
            datapoint.addLabely("Mar", r.Next(0, 500).ToString());
            datapoint.addLabely("Apr", r.Next(0, 500).ToString());
            datapoint.addLabely("May", r.Next(0, 500).ToString());
            datapoint.addLabely("Jun", r.Next(0, 500).ToString());
            datapoint.addLabely("Jul", r.Next(0, 500).ToString());
            canvas.addData(datapoint);
            bunifuDataViz1.colorSet.Add(Color.DarkSeaGreen);
            bunifuDataViz1.Render(canvas);
        }
          private void timer1_Tick(object sender, EventArgs e)
        {

            firstQuaterGraph(random);
            timer1.Stop();
        }

        private void quaterOneBunifuButton_Click(object sender, EventArgs e)
        {
            firstQuaterGraph(random);
        }

        private void quaterTwobunifuButton6_Click(object sender, EventArgs e)
        {
            secondQuater(random);
        }

        private void quaterThreeBunifuButton7_Click(object sender, EventArgs e)
        {
            thirdQuaterGraph(random);
        }
[VB.NET]
Private random As New Random()
		Private Sub firstQuaterGraph(ByVal r As Random)
			Dim canvas = New Bunifu.DataViz.Canvas()
			Dim datapoint = New Bunifu.DataViz.DataPoint(Bunifu.DataViz.BunifuDataViz._type.Bunifu_line)
			datapoint.addLabely("Jan", r.Next(0, 500).ToString())
			datapoint.addLabely("Feb", r.Next(0, 500).ToString())
			datapoint.addLabely("Mar", r.Next(0, 500).ToString())
			datapoint.addLabely("Apr", r.Next(0, 500).ToString())
			datapoint.addLabely("May", r.Next(0, 500).ToString())
			datapoint.addLabely("Jun", r.Next(0, 500).ToString())
			datapoint.addLabely("Jul", r.Next(0, 500).ToString())
			canvas.addData(datapoint)
			bunifuDataViz1.colorSet.Add(Color.DarkSeaGreen)
			bunifuDataViz1.Render(canvas)

		End Sub
		Private Sub secondQuater(ByVal r As Random)
			Dim canvas = New Bunifu.DataViz.Canvas()
			Dim datapoint = New Bunifu.DataViz.DataPoint(Bunifu.DataViz.BunifuDataViz._type.Bunifu_stepArea)
			datapoint.addLabely("Jan", r.Next(0, 500).ToString())
			datapoint.addLabely("Feb", r.Next(0, 500).ToString())
			datapoint.addLabely("Mar", r.Next(0, 500).ToString())
			datapoint.addLabely("Apr", r.Next(0, 500).ToString())
			datapoint.addLabely("May", r.Next(0, 500).ToString())
			datapoint.addLabely("Jun", r.Next(0, 500).ToString())
			datapoint.addLabely("Jul", r.Next(0, 500).ToString())
			canvas.addData(datapoint)
			bunifuDataViz1.colorSet.Add(Color.DarkSeaGreen)
			bunifuDataViz1.Render(canvas)

		End Sub
		Private Sub thirdQuaterGraph(ByVal r As Random)
			Dim canvas = New Bunifu.DataViz.Canvas()
			Dim datapoint = New Bunifu.DataViz.DataPoint(Bunifu.DataViz.BunifuDataViz._type.Bunifu_bar)
			datapoint.addLabely("Jan", r.Next(0, 500).ToString())
			datapoint.addLabely("Feb", r.Next(0, 500).ToString())
			datapoint.addLabely("Mar", r.Next(0, 500).ToString())
			datapoint.addLabely("Apr", r.Next(0, 500).ToString())
			datapoint.addLabely("May", r.Next(0, 500).ToString())
			datapoint.addLabely("Jun", r.Next(0, 500).ToString())
			datapoint.addLabely("Jul", r.Next(0, 500).ToString())
			canvas.addData(datapoint)
			bunifuDataViz1.colorSet.Add(Color.DarkSeaGreen)
			bunifuDataViz1.Render(canvas)
		End Sub
		  Private Sub timer1_Tick(ByVal sender As Object, ByVal e As EventArgs)

			firstQuaterGraph(random)
			timer1.Stop()
		  End Sub

		Private Sub quaterOneBunifuButton_Click(ByVal sender As Object, ByVal e As EventArgs)
			firstQuaterGraph(random)
		End Sub

		Private Sub quaterTwobunifuButton6_Click(ByVal sender As Object, ByVal e As EventArgs)
			secondQuater(random)
		End Sub

		Private Sub quaterThreeBunifuButton7_Click(ByVal sender As Object, ByVal e As EventArgs)
			thirdQuaterGraph(random)
		End Sub
- Now that was a heap of code composed… But we’re done with the DataViz! Satisfied that there are no bungles in the code😅.
And now here’s our preview:

Let’s move to the next frame…
Below is a map of all the controls used:

So let’s begin:
- Go to Project > Add User Control, and name your control Arrival analysis.cs.
- Next, navigate to its properties and set its size to 760,220. Also for the backColor, we’ll use an R.G.B color value of 31,43,50.
- Drag the above controls to the user controls and set its properties to mimic the above preview.
- After you’re finished with designing the control, we can get to adding some code for it to have some dynamism in it. Here’s a preview:

- Navigate to the code view and type the following code:
[C#]
 private void timer1_Tick(object sender, EventArgs e)
        {
            Random random = new Random();

            bunifuCircleProgressbar1.Value = random.Next(0, 100);
            bunifuLabel7.Text = random.Next(1, 7).ToString()+ " nights";
            bunifuLabel9.Text = random.Next(1, 7).ToString()+ " nights";
            bunifuLabel10.Text = random.Next(1, 7).ToString()+ " nights";
            bunifuLabel11.Text = RandomDay() + " - " + RandomDay();
            bunifuLabel12.Text = RandomDay() + " - " + RandomDay();
            bunifuLabel13.Text = RandomDay() + " - " + RandomDay();
            bunifuColorTransition1.ProgessValue = bunifuCircleProgressbar1.Value;
            bunifuCircleProgressbar1.ProgressColor = bunifuColorTransition1.Value;
        }
        private Random gen = new Random();
        string RandomDay()
        {
            int mm, dd;
            mm = gen.Next(1, 12);
            dd = gen.Next(1, 31);
            string date = string.Format("{0}.{1}.18",mm,dd);
            return date;
        }

    }
[VB.NET]
 Private Sub timer1_Tick(ByVal sender As Object, ByVal e As EventArgs)
			Dim random As New Random()

			bunifuCircleProgressbar1.Value = random.Next(0, 100)
			bunifuLabel7.Text = random.Next(1, 7).ToString() & " nights"
			bunifuLabel9.Text = random.Next(1, 7).ToString() & " nights"
			bunifuLabel10.Text = random.Next(1, 7).ToString() & " nights"
			bunifuLabel11.Text = RandomDay() & " - " & RandomDay()
			bunifuLabel12.Text = RandomDay() & " - " & RandomDay()
			bunifuLabel13.Text = RandomDay() & " - " & RandomDay()
			bunifuColorTransition1.ProgessValue = bunifuCircleProgressbar1.Value
			bunifuCircleProgressbar1.ProgressColor = bunifuColorTransition1.Value
 End Sub
		Private gen As New Random()
		Private Function RandomDay() As String
			Dim mm, dd As Integer
			mm = gen.Next(1, 12)
			dd = gen.Next(1, 31)
			Dim [date] As String = String.Format("{0}.{1}.18",mm,dd)
			Return [date]
		End Function

	}
After completing the above step, we can now add the final touches for ensuring that the main form will render the user control. This is by building the solution and drag the user control to the main form.
Presently how about we move to the fascinating part where we’ll make another user control. Repeat the same procedure for creating a user control and name it RecentActivity.cs.
Firstly off, see what we can use for the section:

Drag the above controls to the user control and set its properties to mirror the above review.
Note that the bunifuSeparotor has a height of 260. Also, it has been sent to back and the Bunifu CheckBox are on top of it. Furthermore, the default state of the checkbox is unChecked.For the colors, please guarantee that you’ve picked every one well (or sufficiently near the sneak peaks… )
After completing the above step, we would now be able to include the last touches for guaranteeing that the User control will be rendered to the form This is by building the solution and drag the user control to the main form.
Here’s a review:

How about we plan another user control. Rehash a similar strategy for making a user control and name it Statistics.cs.
This is what we’ll be building:

Shouldn’t something be said about we see the controls highlighted in the segment before designing? That is correct. We should say something in regards to the controls featured.
Here is the controls’ set:

Drag the above controls to the user control and set its properties to mirror the above review.
Let’s trace how we’ll achieve the above design for the drop-down:
- ForeColor: 109,117,121.
- IndicatorColor:109,117,121.
- ItemBackColor:31,43,50.
- ItemBorderColor:31,43,50.
- ItemForeColor:109,117,121.
- ItemHighLightColor: GreenYellow
After completing the above step and placing all the controls, let’s place a few items in the drop-down box.Navigate to the items property and provide the following string collections highlighted in this review:

Next, we need to use the SelectedIndexChanged event of the drop-down to change the values for the progress bar and alter the text property of the labels. Here’s the code:
[C#]
private void bunifuDropdown1_SelectedIndexChanged(object sender, EventArgs e)
        {
            Random random = new Random();
            bunifuLabel1.Text = random.Next(0, 100).ToString() + " hours";
            bunifuLabel2.Text = random.Next(0, 100).ToString() + " hours";
            bunifuLabel3.Text = random.Next(0, 100).ToString() + " hours";
            bunifuProgressBar1.Value = random.Next(0, 100);
            bunifuProgressBar2.Value = random.Next(0, 100);
            bunifuProgressBar3.Value = random.Next(0, 100);
        }
[VB.NET]
Private Sub bunifuDropdown1_SelectedIndexChanged(ByVal sender As Object, ByVal e As EventArgs)
			Dim random As New Random()
			bunifuLabel1.Text = random.Next(0, 100).ToString() & " hours"
			bunifuLabel2.Text = random.Next(0, 100).ToString() & " hours"
			bunifuLabel3.Text = random.Next(0, 100).ToString() & " hours"
			bunifuProgressBar1.Value = random.Next(0, 100)
			bunifuProgressBar2.Value = random.Next(0, 100)
			bunifuProgressBar3.Value = random.Next(0, 100)
End Sub
After writing that code, build and drag the statistics control to the main form then run. This is what we’ll achieve:

Here’s a full preview of what we’ve made:
Conclusions
That would have been a ton of work with normal controls available in .NET but has been simplified with help of Bunifu UI tools because of its adaptability and capacity to redo further.. I really hope you have learned something and if you have feedback or suggestions please leave me a comment below.In the event that you like the instructional exercise, a few applauds will go far!
Cheerful coding and planning! 👊
Is there a github repo for this?
Hi, you can visit: https://github.com/bunifu-framework
hello
this is really a good work
awesome.
is there any form of pdf tutorial for Bunifu UI design?
I have an error in my DataViz project…
My errors lines:
var canvas = new Bunifu.DataViz.Canvas(); //here is in Convas
var datapoint = new Bunifu.DataViz.DataPoint(Bunifu.DataViz.BunifuDataViz._type.Bunifu_line); //here is in DataPoint
How can I fix it? Healp, please!