


How I Designed a Store Shop Dashboard with Bunifu UI in C#
In this article we will be creating an inspiration desktop dashboard, using Bunifu UI and Microsoft Visual Basic Powerpacks controls that we will download and integrate it in visual studio.
Controls Features
Here are the controls featured in the dashboard. Let’s take a quick preview of them before we begin our design tour.

Start Your Journey
Begin your journey into creating your StoreShop dashboard UI by establishing the essentials.
On how to Install the Bunifu UI framework
- First go to Tools on top bar of your Visual studio then click on tools whereby a popup menu will appear then click on NuGet Package Manager then click Manage NuGet Packages for solution. Then go to the Browser and search and select and type Bunifu UI in the search Box.
- And finally add the magic to your Storeshop dashboard, so install and integrate your Bunifu UI Winforms from the list and click install. Then a pop up will appear then, Agree and proceed to complete the installation.
- Download the Microsoft Visual Basic PowerPacks from the Microsoft website and install it.
- Also, you need to have the icons8 software and a just in color picker for selecting colors and icons respectively. Having downloaded icons, create a folder and copy them to the created folder.
Note: If you do not have a license for Bunifu UI, don’t worry! Bunifu offers a free trial, allowing you to experience its full range of features before committing to a purchase. Visit the Bunifu website for more details on the trial.
It’s great, let’s know how to design our dashboard.
- We need to start a new project in Visual Studio, then select a C# project and name your project as Storeshop Dashboard UI. Once the form appears, set an appropriate size and properties that can fill your controls
SetSize: 1424, 883
BackColor: 16,16, 17
")
- Great! Let’s continue with the next step in our StoreShop Dashboard UI design process.
Add BunifuDock into your form
- Search bunifuDock from toolbox and drag into your form to make your form movable and flexible then set its properties as.
titleBarOptions: Form1
")
- With Bunifu UI developers find easier and simpler to solve their problems
- We will be utilizing the Bunifu UI controls, particularly the BunifuPanel.
Add bunifuPanel
- Adding bunifuPanel is simple, go to toolbox and search for bunifuPanel then Drag in the BunifuPanel and set properties as;
Dock: left.
backColor: 27, 30, 32
Size: 260, 883
borderColor: 27, 30, 32
")
- After you have set your bunifuPanel, Let’s create our side bar menu,
Add bunifuPicture and bunifuLabel
Drag bunifuPicture from your toolbox and set its properties as;
size: 35, 35
dock: top, left
Then, search and drag bunifuLabel from tool box and sets appropriate properties.
Add bunifuSeparator
search and drag in bunifuSeparator from your toolbox and set approximate size.
Your UI should look like this;
")
Before we continue let me ask a simple question, how can we create interfaces that not only meet user needs but also anticipate desires they didn’t know they had? the answer is simple just integrate with bunifu framework and you will find it easy and simple.
Add bunifuButton
- Interesting, let’s create our bunifu buttons for the menu and provide properties.
- First let’s drag our bunifuButton from toolbox then we set properties.
Size: 229, 45
text: Banana Store
backColor:
foreColor: 160, 160, 167
location: 12, 90
textPadding: 50, 0, 0, 0
- Click on the plus sign on the OnIdleState property then set,
Padding: 10,0,0,0
backColor: Transparent
BoarderRadius: 12
ForeColor: grey
FillColor: Transparent
- And iconLeftImage property, click and a pop up will appear then import the image from the folder where you save your icon.
- OnHoverState property, click the plus sign on OnHoverState then you set properties as follows;
BorderColor: 32,32,37
BorderRadius: 12
FillColor: 32,32,37
ForeColor: 160, 160, 167
- then click iconLeftImage and import appropriate icon same in OnhoverState property
- For the other buttons follow the same procedures above and finally you will arrive to desired solution
- Your final solution will look like this.
")
Add bunifuTextBox
- Drag bunifuTextBox from toolbox and set properties as
backColor: Transparent
iconLeft: import from your folder
borderRadius: 8
location: X: 25, Y:26
- Add bunifuPicture and set its properties as;
size: 35, 35
image: choose from your folder
- Add bunifuLabel and set its appropriate properties
- your design will look like this;
")
Adding bunifuButton and setting its properties
- Drag your bunifuButton from toolbox and set properties as;
size: 91, 35
location: 1013, 79foreColor: 160, 160, 167
iconLeft: import appropriate icon from your folder
iconRight: import appropriate icon from your folder
anchor: top, right
- copy and paste for the other button and set its properties and change its icons.
- and your solution will look like this;
")
Adding bunifuPanel
- search and drag bunifuPanel from the toolbox then set its properties as;
anchor: top, left
PanelColor & ShadowColor: 27, 27, 27
Size: 252, 177
location: 292, 156
")
- let’s add our content inside the panel;
- drag in bunifuPicture and set its
size: 20,20,
- then drag in the bunifuLabel and set its properties as;
fontSize: 9
- add bunifuSeperator and set its approximate size.
- and finally copy and paste your finished panel then you change properties.
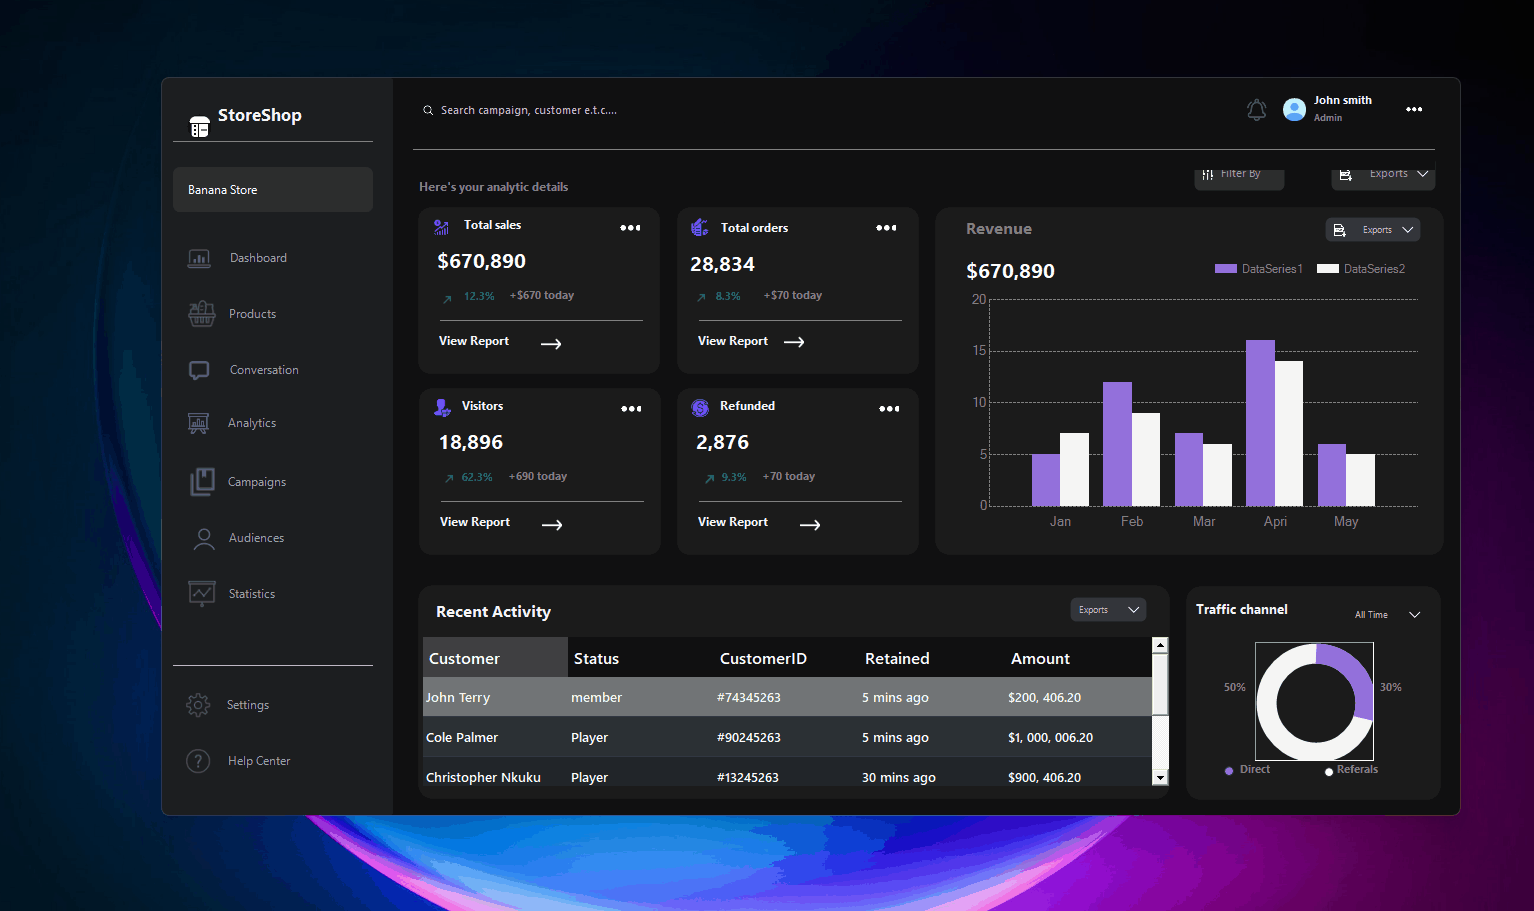
- This is the final solution.
")
Adding charts in my dashboard.
- Search and Drag in bunifuPanel from your toolbox and set its properties to;
PanelColor: 27, 27, 27
size: 499, 358
BordersRadus: 12
location: 769, 125
- After adding your bunifuPanel, add bunifuLabel and set its appropriate properties.
- and your UI will resemble like this down below;
")
- Nice, set your charts by drag in charts from toolbox and sets its properties as follows;
- for our chart to work, we need to insert some code, so open your Form1 then on your right side open events and double tab on Load event then put this code below.
")
Adding bunifuDataGrid
- First, drag in your bunifuPanel from toolbox and set its properties,
- then add bunifuDataGrid into your panel. so drag in bunifuDataGrid from toolbox and set its properties as;
currentTheme:
BackColor: 15, 16, 18
GridColor: 50, 56, 62
")
Adding bunifuPanel
- search and Drag in bunifuPanel from toolbox and set its properties as;
PanelColor: 27, 27, 27
size: 265, 224
BordersRadus: 12
")
Let’s add bunifuCircleProgress into our form
- start by draging bunifuCircleProgress from toolbox then set its properties as
ProgressBackColor: WhiteSmoke
ProgressColor: MediumPurpleSize: 119, 119
Location: 74, 61
")
Conclusion
- Implementing an effective Storeshop is crucial for driving business growth and improving customer relationships. The Bunifu Framework offers a robust and user-friendly set of tools that can help streamline your sales processes, enhance your team’s productivity, and deliver insightful analytics.
- If you haven’t already explored the Bunifu Framework, now is the perfect time to get started. Visit the official Bunifu website to learn more about their product offerings, access comprehensive documentation, and explore tutorials that can help you get up and running quickly.
- Stay Connected for my next article;
- also i have a video of the same in youtube just click here to check a video of the same.
- To ensure you don’t miss out on any updates, subscribe to our newsletter to get the latest articles and also follow us on youtube and have fun.
- if you find helpful, let me know by writing a comment below. Thank you.


–