How I designed a Cryptocurrency UI/UX Dashboard for Sales Management
In this article we will be creating an inspiration desktop dashboard inspired by Bragas Prayogo’s concept for Morva Labs. We will be using Bunifu UI and Microsoft Visual Basic PowerPacks controls that we will download and integrate it in visual studio.
let’s review our dashboard
Controls Features
Here are the controls featured in the dashboard. Let’s take a quick preview of them before we begin our design tour
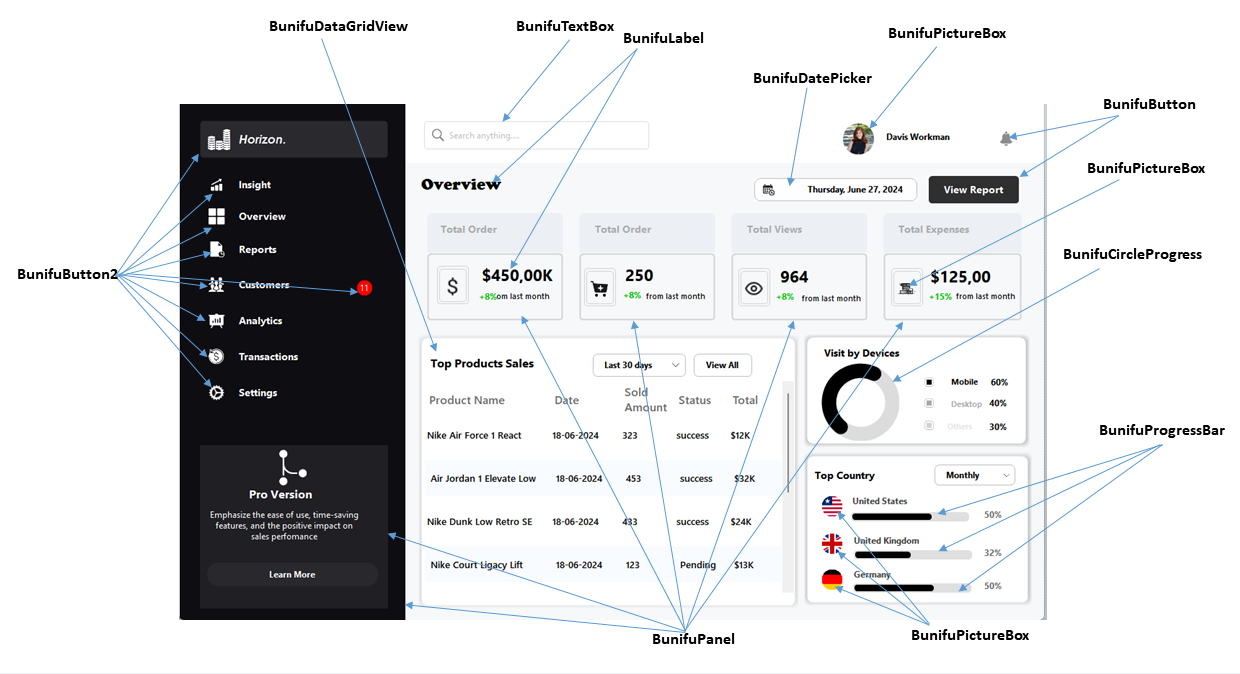
In the bustling world of cryptocurrency, where volatility is the norm and fortunes can change in an instant, CoinMate emerged as a beacon of stability and success. Founded by tech enthusiast Sarah Martinez in 2017, CoinMate aimed to simplify the complexities of cryptocurrency trading for everyday users. However, by 2020, the company faced a critical challenge: managing their sales pipeline effectively as their user base grew exponentially.
Sarah realized that traditional sales management systems were not equipped to handle the unique demands of the cryptocurrency market. Transactions occurred at lightning speed, regulations varied across regions, and the sales team needed real-time data to make informed decisions. Recognizing these challenges, Sarah set out to create a customized sales management system tailored specifically for the cryptocurrency industry.
Kickstart Your Journey
- Begin your adventure into creating a stunning Sales Management Dashboard by setting up the essentials.
- First, let’s set up our environment.
I will be using Bunifu Framework for WinForms in this example. If you do not have a license for Bunifu UI, don’t worry! Bunifu offers a free trial, allowing you to experience its full range of features before committing to a purchase. Visit the Bunifu website for more details on the trial. Also, you need to have the icons8 software and a just in color picker for selecting colors and icons respectively. Having downloaded icons, create a folder and copy them to the created folder.
How to Install Bunifu UI Framework.
- For you to add a professional touch with sleek UI controls, follow these steps to Install the Bunifu UI framework:
Open tools on top then open NuGet Package Manager then Accessing Your Palette: Go to Tools =>NuGet Package Manager =>Manage NuGet Packages for Solution. then Search and Select In the Browse tab, type Bunifu UI in the search box. then =>Add the Magic to your UI form by Install and Integrate: Choose Bunifu UI WinForms from the list and click Install. then Agree and Proceed: Accept the license agreement to complete the installation. if you need guidance on how to intall bunifu Framework, just go to youtube by clicking here
Great, Lets know design our dashboard.
- First thing we need to do is to start a new project in Visual Studio, then choose a C# project and name your project as Sales Management Dashboard UI. Once the form appears, set an appropriate size and properties that can fill your controls.
Set size: 1220,760
Backcolor: 246,248,250

- Great! Let’s continue with the next step in our Sales Management Dashboard UI design process. We’ll be working with the Bunifu UI controls, specifically the BunifuPanel.
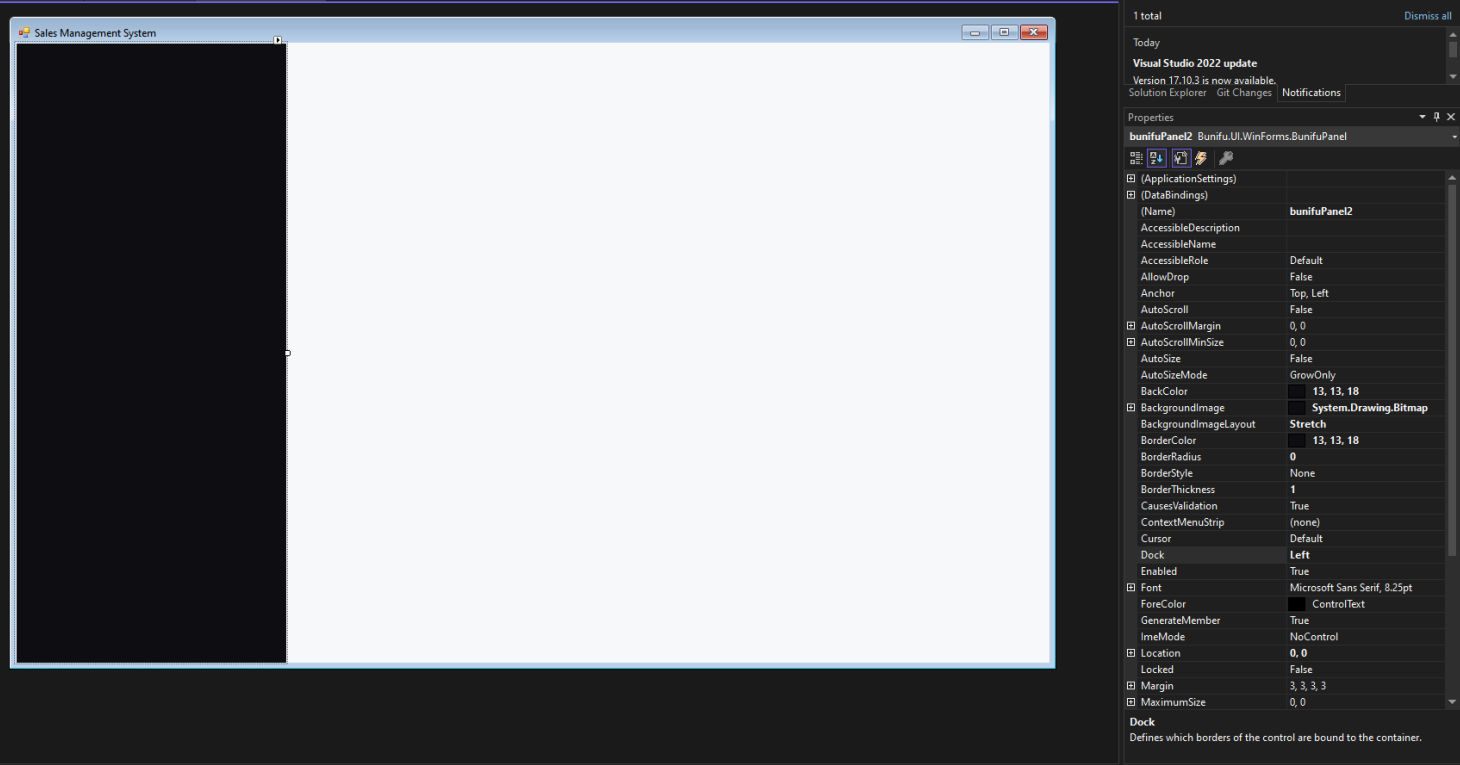
- Adding bunfuPanel is simple, go to toolbox and search for bunifuPanel then Drag in the BunifuPanel and set properties as;
Dock: left.
Backcolor: 13, 13, 18,
Size: 314,720,
BorderColor: 13, 13, 18
“With Bunifu UI, developers can easily implement modern, sleek interfaces that enhance the overall user experience.”
- After you have set your bunifuPanel, Let’s create our buttons for the menu and provide properties;
- First let’s drag our bunifuButton from toolbox then we set properties to;
Size: 261, 44;
Text: Insight;
location 29,93
- Click on the plus sign on the OnIdleState property then set,
Padding: 10,0,0,0;
BackColor: Transparent;
BoarderRadius:8;
ForeColor: white;
FillColor: Transparent
-
And iconLeftImage property, click and a pop up will appear then import the image from the folder where you save your icon.
- OnHoverState property, click the plus sign on OnHoverState then you set properties as follows;
BorderColor: 32,32,37;
BorderRadius: 8;
FillColor: 32,32,37;
ForeColor: white;
- then click iconLeftImage and import appropriate icon same in OnhoverState property.
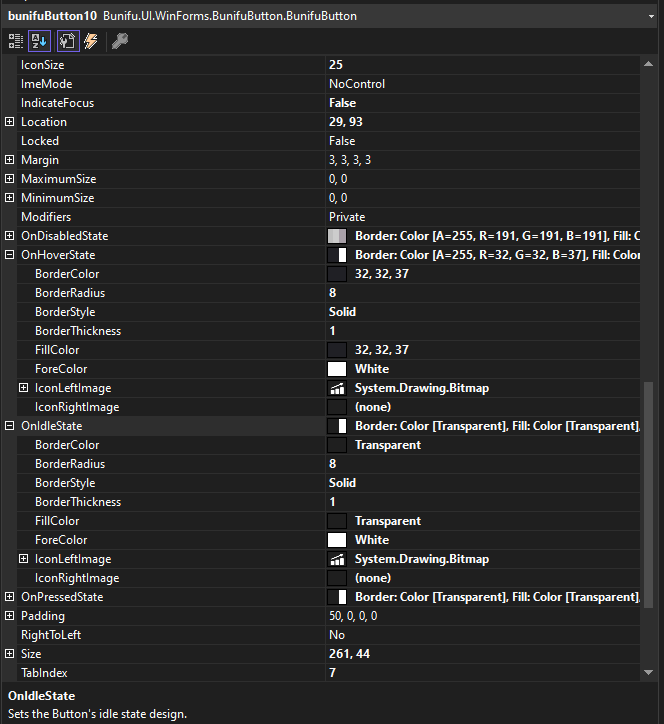
- For the other buttons follow the same procedures above and finally you will arrive to desired solution.
- Your final solution will look like this;

- The next move, lets drag bunifuPanel from toolbox and set the properties as;
Size: 261,227
BackColor: 32,32,36
Size: 261,227
Location: 29,477

- Now drag in the bunifuPictureBox and then choose image and select your Pro version image inside our folder,

- Then, drag bunifuLabel from toolbox and set its properties as;
Forecolor: white

- Drag bunifuButton from your toolbox and set properties.
Text: Learn More

Add navbar
You are doing great, lets now create our navbar, so first drag the bunifuPanel from toolbox and set its properties with help of just color picker;
BackColor: white
Dock: top

Add bunifuTextBox
- Drag bunifuTextBox from toolbox and set properties as;
BackColor: Transparent
IconLeft: import from your folderBorderRadius: 8
location: X: 25, Y:26

Add bunifuPictureBox
- Drag your bunifuPictureBox and set its properties as;
size: 45, 45
borderRadius: 35

Add bunifuDatePicker
- Drag bunifuDatePicker from your toolbox and add in your form.
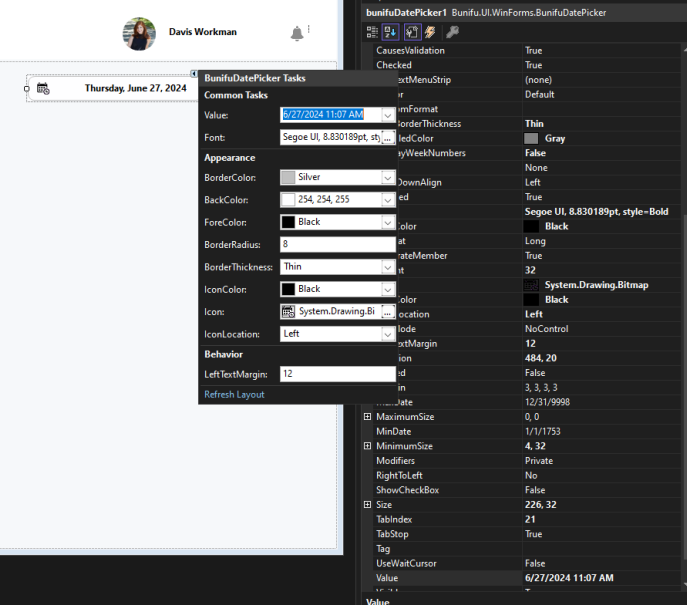
Add bunifuButton
Drag bunifuButton from toolbox and set its properties;
text: view report
borderColor: 47,47,47
fillColor: 47,47,47
forecolor: white

Add TableLayoutPanel
- First, Drag the tableLayoutPanel from the toolbox to your form and set the following properties to it;
- On the right side of your tableLayoutPanel click the play button and set the appropriate properties for your tableLayoutPanel;
- Set, column Percentage to 25% as shown below;

- After you have set your tableLayoutPanel, then drag your bunifuPanel from toolbox and dock: fill. Do for the rest of columns in the table.
- Wow, now drag in the label from the toolbox and set the properties to;
Dock: fill
backColor: transparent
- After that drag your panel from toolbox and set its properties as follows;
- Your tableLayoutPanel must look like this;

Add bunifuPanel
- first drag in the bunifuPanel to our form, then set your appropriate size and properties to:
BackColor: white
BorderRadius: 8
Location: 17, 236

Add label and bunifuButton
- First drag in your bunifuLabel and set your properties to
Text: Top Products Sales
foreColor: black, bold
- Then drag your bunifuButton from toolbox and set appropriate properties;
iconRight: select the icon from your folder
borderColor: grey
fillColor: transparent

Add bunifuDataGridView
- First drag in the bunifuDataGridView1 to your bunifuPanel and edit columns and insert the properties.
- Click on the Edit columns

- Then, you add column and click ok.

The code for adding rows and data into our dataGrid;

Add bunifuPanel
- Next step is to drag bunifuPanel from your toolbox and set properties to;
backColor: white, borderRadius: 8
backColor: white
location: 552,236
size: 314,256

Add bunifuCircleProgress
- Drag bunifuCircleProgress in your toolbox, set its properties;
- Then drag in the label and and set properties to;
- Then drag the bunifuButton and delete the text then set properties to;
- Your UI will look like this
size: 108,108
foreColore: black
backColor: black
size: 8, 8

- Add bunifuPanel from toolbox then set its properties:
Backcolor: white
borderRadius: 8
location: 552, 400
size: 317, 214

- Add bunifuPictureBox to the bunifuPanel and set its properties to;
Size: 20,20
bordersRadius: 35
- click on the player button then select then image from your folder

- Drag in the bunifuProogressBar from the toolbox then set its properties;
borderRadius: 9

- Then drag in bunifuLabel and set properties to;
Text: 50%
Color: light grey
- Then follow the same procedures for the rest of the text and progress bar.

Conclusion
- Implementing an effective sales management system is crucial for driving business growth and improving customer relationships. The Bunifu Framework offers a robust and user-friendly set of tools that can help streamline your sales processes, enhance your team’s productivity, and deliver insightful analytics.
- If you haven’t already explored the Bunifu Framework, now is the perfect time to get started. Visit the official Bunifu website to learn more about their product offerings, access comprehensive documentation, and explore tutorials that can help you get up and running quickly.
- Stay Connected for my next article;
- To ensure you don’t miss out on any updates, subscribe to our newsletter to get the latest articles and also follow us on youtube and have fun



Leave A Comment