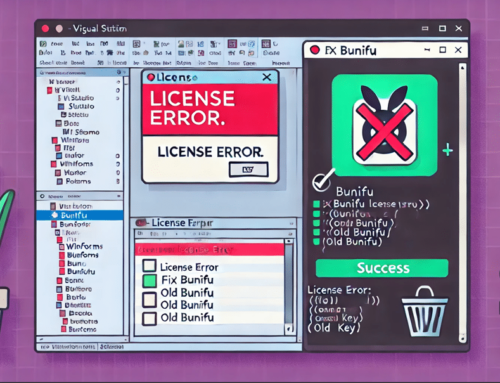

Welcome to our interactive guide on creating a sleek cryptocurrency dashboard using WinForms and BunifuUI in Visual Studio Code! Whether you’re a seasoned developer or just starting, this step-by-step tutorial will help you design a simple modern interface that you’ll be proud to show off. Get ready to dive into the world of UI design with Bunifu controls and transform your ideas into a visually appealing dashboard. Let’s get started on this exciting journey to build your very own Cryptocoin dashboard!

Setting Up Your Project
Start by creating a new project:
Open Visual Studio Code and create a new WinForms project using C# or VB (Visual Basic). By default, your initial form will be Form1.
Set Initial Form Properties:
In the Properties tab (usually on the right side & if you can’t find it, use the shortcut F4 or go to View in the top menu, scroll down and select Properties), adjust the following settings for Form1:
BackColor: 27, 38, 39; Font: Montserrat, 14pt, style= Regular (Download and install this font here); ForeColor: 27, 38, 39; FormBorderStyle: None; Icon: (Download an icon from icons8 or use the default icon); Size: 1300, 713; StartPosition: CenterScreen; Text: Cryptocoin; WindowState: Normal
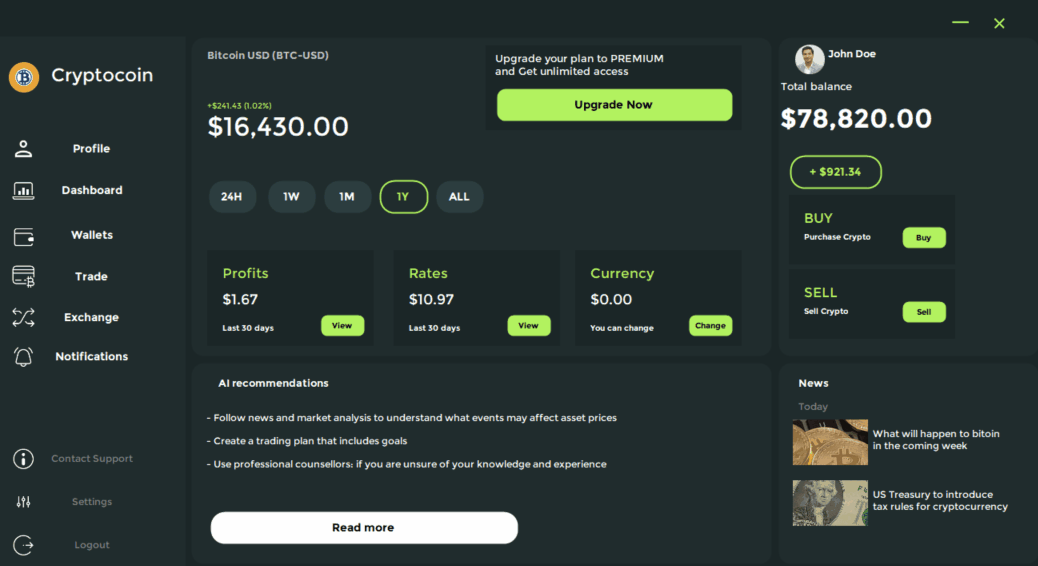
The form you have created should look like the form in the screenshot below:

Now let’s create the Dashboard Panels
Search for BunifuPanel in the Toolbox (on the left). If Toolbox doesn’t appear, Go to View in the top menu bar, and select Toolbox or use the shortcut Ctrl+Alt+X.
Resize and arrange the panels as shown in the layout image below:

Set the properties for these panels as:
BackColor: 32, 44, 45; BorderColor: Transparent; BorderRadius: 30; ForeColor: 27, 38, 39
For the arrangement and positions, use the following positions and sizes for them: Note that the names are not exact in Visual Studio Code. This is a guide. Check the corresponding Panel name with the location and size below:
Panel 1: Location: 0, 3; Size: 1300, 43; Panel 2: Location: 0, 47; Size: 232, 666; Panel 3: Location: 238, 47; Size: 728,401; Panel 4: Location: 972, 47; Size: 328, 401; Panel 5: Location: 238, 454; Size: 728, 254; Panel 6: Location: 972, 454; Size: 328, 254
Now let’s add a title and an icon to our Dashboard in Panel No. 2
Select PictureBox from the Toolbox and add an image for your dashboard icon from isons8 or your local storage. Set the properties: Location: 2, 32; Size: 56,38
Select BunifuLabel to create the title Cryptocoin with the following properties: BackColor: None; Font: Montserrat, 14pt; ForeColor: White; Location: 64, 34; Size: 157, 34

Let’s add a touch of design by adding the dashboard navigation buttons
Select BunifuButton2 and assign these properties:
ForeColor: White; IdleBorderColor: Transparent; IdleBorderRadius: 30; IdleFillColor: Transparent; IdleIconLeftImage: Choose an image from your source; Text: Profile, Dashboard, Wallets, Trade, Exchange, Notifications, Contact Support, Settings, Logout; For OnHoverState and OnPressedState: BorderColor: 178, 243, 95; FillColor: 178, 243, 95; ForeColor: White (You can use Gray for the texts, Contact Support, Settings and Logout)
Set the following locations and sizes for the dashboard buttons:
Profile: Location: 3, 116; Size: 226,48; Dashboard: Location: 3, 168; Size: 226,48; Wallets: Location: 3, 224; Size: 226,48; Trade: Location: 3, 276; Size: 226,48; Exchange: Location: 3, 327; Size: 226,48; Notifications: Location: 3, 376; Size: 226,48; Contact Support: Location: 3, 504; Size: 226,48; Settings: Location: 3, 558; Size: 226,48; logout: Location: 3, 612; Size: 226,48;

Great! now let’s move to create Panel 3
Select BunifuLabel and set properties for three different labels:
BackColor: Transparent; Font: Montserrat, 8pt, style=Bold; ForeColor: Silver; Location: 21, 15; Size: 186, 19; Text: Bitcoin USD (BTC-USD)
Repeat the process above for two more labels and make the changes below:
BunifuLabel: ForeColor: 178, 243, 95; Location: 21, 80; Size: 93, 15; Text: +$241.43 (1.02%)
and another BunifuLabel; ForeColor: White; Location: 21, 92; Size: 217, 49; Text: $16,430.00
We will add the period buttons. Follow through:
Select BunifuButton2 and set these properties:
Font: Montserrat, 8pt, style-Bold; ForeColor: White; IdleBorderColor: Transparent; IdleBorderRadius: 35; IdleBorderThickness: 2; IdleFillColor: 44, 61, 63; Location: 21, 178; Size: 64, 45; Text: 24H; For OnHoverState and OnPressedState: BorderColor: 178, 243, 95; FillColor: Transparent; ForeColor: 178, 243, 95; Size: 64, 45
Repeat the same but make changes to the buttons indicated:
1W: Location: 95, 178; Size: 64, 45; 1M: Location: 165, 178; Size: 64, 45; 1Y: Location: 235, 178; Size: 64, 45; ALL: Location: 305, 178; Size: 64, 45

We will then add the Upgrade Now panel
Select BunifuPanel and draw it at the top right and add the properties below:
BackColor: Transparent; BorderColor: Transparent; BorderRadius: 30; ForeColor: 27, 38, 39; Location: 369, 11; Size: 320, 106
Inside this panel, add a BunifuLabel and add the following properties:
BackColor: Transparent; Font: Montserrat, 8pt; ForeColor: White; Location: 12, 8; Size: 253, 38; Text: Upgrade your plan to PREMIUM and get unlimited access.

For the Text above to fit as in the design below; click the down button at the Text property to reveal typing area and type as indicated (use Enter Key after ‘PREMIUM’)
")
To finish up with the Upgrade Now button, select BunifuButton2 and set the properties as:
Font: Montserrat, 8pt, style-Bold; ForeColor: Black; IdleBorderColor: Transparent; IdleBorderRadius: 20; IdleBorderThickness: 2; IdleFillColor: 178, 243, 95; Location: 12, 52; OnHoverState: ( BorderColor: 178, 243, 95; FillColor: Transparent; ForeColor: 178, 243, 95); OnPressedState: (BorderColor: 178, 243, 95; FillColor: Transparent; ForeColor: White); Size: 299, 45; Text: Upgrade Now
For the Profits, Rates and Currency panels and buttons in the design, follow through:
Select BunifuPanel and set the properties:
BackColor: Transparent; BorderColor: Transparent; BorderRadius: 30; ForeColor: 27, 38, 39; Location: 21, 267; Size: 208, 120
Select and add BunifuLabel for the text ‘Profits’ and add the properties:
BackColor: Transparent; Font: Montserrat, 10pt; ForeColor: 178, 243, 95; Location: 19, 19; Size: 66, 24; Text: Profits
Duplicate the BunifuLabel above for additional labels for the text ‘$1.67’ and set the properties:
BackColor: Transparent; Font: Montserrat, 11pt; ForeColor: White; Location: 19, 51; Size: 54, 27; Text: $1.67
Duplicate the BunifuLabel a second time for the text ‘Last 30 days’ and set the properties:
BackColor: Transparent; Font: Montserrat, 6pt, style=Bold; ForeColor: White; Location: 19, 91; Size: 74, 15; Text: $1.67
Add the View button:
Select BunifuButton2 and set the properties as:
Font: Montserrat, 6pt, style=Bold; ForeColor: Black; IdleBorderColor: Transparent; IdleBorderRadius: 15; IdleBorderThickness: 2; IdleFillColor: 178, 243, 95; Location: 140, 79; Text: View; OnHoverState: (BorderColor: 178, 243, 95; FillColor: Transparent; ForeColor: 178, 243, 95); OnPressedState: (BorderColor: 178, 243, 95; FillColor: Transparent; ForeColor: White)
After these set up of the properties, the design should like the image below. Interesting right!

Very nice! Now we’ll create a profile and a wallet balance section in Panel 4. So follow the steps:
Select BunifuPictureBox and use your preferred picture as the icon and use the properties:
BackColor: 27, 38, 39; Location: 21, 9; Size: 39,39; Type: Circle
Select and add BunifuLabel for profile information and set the properties as:
BackColor: Transparent; Font: Montserrat, 8pt, style=Bold; ForeColor: White; Location: 63, 13; Size: 75, 19; Text: John Doe
Repeat the following steps for the texts (BunifuLabel) in brackets:
(Total balance) Select and add BunifuLabel for profile information and set the properties as:
BackColor: Transparent; Font: Montserrat, 8pt; ForeColor: White; Location: 4, 54; Size: 106, 19; Text: Total balance
($78,820.00) Select and add BunifuLabel for profile information and set the properties as:
BackColor: Transparent; Font: Montserrat, 8pt, style=Bold; ForeColor: White; Location: 3, 82; Size: 232, 49; Text: $78,820.00
To create the crypto increase button, select BunifuButton2 and set properties:
ForeColor: White; IdleBorderColor: Transparent; IdleBorderRadius: 35; IdleBorderThickness: 2; IdleFillColor: 44, 61, 63; Location: 14, 147; OnHoverState: (BorderColor: 178, 243, 95; FillColor: Transparent; ForeColor: 178, 243, 95; ) OnPressedState: (BorderColor: 178, 243, 95; FillColor: Transparent; ForeColor: White; ) Size: 118, 45; Text: +$921.34
To add the Buy Crypto Section, select BunifuPanel and set properties:
BackColor: Transparent; BorderColor: Transparent; BorderRadius: 30; ForeColor: 27, 38, 39; Location: 14, 198; Size: 208, 87
To add the text labels, select and add BunifuLabel for the text ‘BUY’ and add the properties:
BackColor: Transparent; Font: Montserrat, 10pt; ForeColor: 178, 243, 95; Location: 19, 19; Size: 41, 24; Text: BUY
Duplicate the BunifuLabel above for additional labels for the text ‘Purchase Crypto’ and set the properties:
BackColor: Transparent; Font: Montserrat, 6pt, style=Bold; ForeColor: White; Location: 19, 46; Size: 101, 15; Text: Purchase Crypto
Add the Buy button: Select BunifuButton2 and set the properties as:
Font: Montserrat, 6pt, style=Bold; ForeColor: Black; IdleBorderColor: Transparent; IdleBorderRadius: 15; IdleBorderThickness: 2; IdleFillColor: 178, 243, 95; Location: 140, 38; OnHoverState: (BorderColor: 178, 243, 95; FillColor: Transparent; ForeColor: 178, 243, 95); OnPressedState: (BorderColor: 178, 243, 95; FillColor: Transparent; ForeColor: White); Size: 59, 31; Text: Buy
To add the Sell Crypto Section follow:
Select BunifuPanel and set properties:
BackColor: Transparent; BorderColor: Transparent; BorderRadius: 30; ForeColor: 27, 38, 39; Location: 14, 291; Size: 208, 87
To add the text labels, select and add BunifuLabel for the text ‘SELL’ and add the properties:
BackColor: Transparent; Font: Montserrat, 10pt; ForeColor: 178, 243, 95; Location: 19, 19; Size: 48, 24; Text: SELL
Duplicate the BunifuLabel above for additional labels for the text ‘Sell Crypto’ and set the properties:
BackColor: Transparent; Font: Montserrat, 6pt, style=Bold; ForeColor: White; Location: 19, 46; Size: 68, 15; Text: Sell Crypto
Add the Sell button: Select BunifuButton2 and set the properties as:
Font: Montserrat, 6pt, style=Bold; ForeColor: Black; IdleBorderColor: Transparent; IdleBorderRadius: 15; IdleBorderThickness: 2; IdleFillColor: 178, 243, 95; Location: 140, 38; OnHoverState: (BorderColor: 178, 243, 95; FillColor: Transparent; ForeColor: 178, 243, 95); OnPressedState: (BorderColor: 178, 243, 95; FillColor: Transparent; ForeColor: White); Size: 59, 31; Text: Sell
Now that we have designed that, it should look like the image below. Very impressive, right?

We will then move on to Panel 5, follow the steps to design:
Select and add BunifuLabel and add the properties:
BackColor: Transparent; Font: Montserrat, 8pt, style=Bold; ForeColor: White; Location: 35, 18; Size: 170, 19; Text: All recommendations
Select and add BunifuLabel and add the properties:
BackColor: Transparent; Font: Montserrat, 7pt; ForeColor: White; Location: 20, 62; Size: 607, 88; Text: Follow news and market analysis to understand what events may affect asset prices. Create a trading plan that includes goals. Use professional counsellors: if you are unsure of your knowledge and experience.
To add the Read more button, select BunifuButton2 and set the following properties:
Font: Montserrat, 8pt, style=Bold; ForeColor: Black; IdleBorderColor: Transparent; IdleBorderRadius: 35; IdleBorderThickness: 2; IdleFillColor: White; Location: 23, 185; OnHoverState: (BorderColor: 178, 243, 95; FillColor: Transparent; ForeColor: 178, 243, 95); OnPressedState: (BorderColor: 178, 243, 95; FillColor: Transparent; ForeColor: White); Size: 389, 45

In panel 6, which also our last panel, we will basically include a label and picture box. Follow the steps below:
Select and add BunifuLabel then set the following properties:
BackColor: Transparent; Font: Montserrat, 8pt, style=Bold; ForeColor: White; Location: 26, 18; Size: 45, 19; Text: News
Select and add BunifuLabel then set the following properties:
BackColor: Transparent; Font: Montserrat, 7pt; ForeColor: Gray; Location: 26, 48; Size: 42, 18; Text: Today
Select and add PictureBox then set the following properties:
BackColor: 27, 38, 39; Image: Select a preffered image from local storage; Location: 19, 72; Size: 94, 57; SizeMode: CenterImage
Select and add BunifuLabel then set the following properties:
BackColor: Transparent; Font: Montserrat, 7pt; ForeColor: White; Location: 119, 82; Size: 188, 36; Text: What will happen to bitcoin in the coming week.
For the second news update, Select and add PictureBox then set the following properties:
BackColor: 27, 38, 39; Image: Select a preffered image from local storage; Location: 19, 148; Size: 94, 57; SizeMode: CenterImage
Select and add BunifuLabel then set the following properties:
BackColor: Transparent; Font: Montserrat, 7pt; ForeColor: White; Location: 119, 158; Size: 198, 36; Text: US Treasury to introduce tax rules for cryptocurrency

For us to start out program and have the option to minimize and close the program, we will download the minimize (-) and close (X) icons from icons8 then follow the steps as we set the properties below.
For the Minimize button, select BunifuPictureBox and add minimize image (-) then set the properties as:
BackColor: 27, 38, 39; Image: Choose the downloaded icon from local storage; Location: 1181, 13; Size: 40, 25
For the Close button, select BunifuPictureBox and add the close icon (X) then set the properties as:
BackColor: 27, 38, 39; Image: Choose the downloaded icon from local storage; Location: 1226, 7; Size: 60, 40

For the buttons to work, we now need to assign functionality to the buttons. Double-click the minimize button to open the code area and add the code below:
If you are using C#, use: this.WindowState = FormWindowState.Minimized;
If you are using VB, use: WindowState = FormWindowState.Minimized
Double-click the close button to open the code area and add:
If you are using C#, use: this.Close();
If you are using VB, use: Me.Close()
The image below shows the uses of the VB code for the functionality of the buttons:

We would also like to add some customization to our dashboard for us to be able to drag the dashboard window. Select BunifuFormDrag and click anywhere in the design to place it in our project then set the properties as:
DockingOptions: Set all to False; TitleBarOptions: TitleBar: Select panel 1 which is the topmost bar in our design

Well, that’s it! You’ve successfully created a cryptocurrency dashboard with a modern interface. Enjoy customizing and enhancing your dashboard further!